Each menu attached to a form has a menu name, display name and a list of items defined for the menu. Application-level menus can also have a set of inherited items that perform specific operations, such as clipboard functions. The Menu Definition window is used to create menus.
Two names are required for each menu. The menu name is the name that is used in scripts to refer to the menu. To make the name easier to use in scripts, we suggest you use underscores (_) instead of spaces between the words in the name.
The display name is the name that appears when the menu is displayed in the menu bar. The menu bar area is limited, so menu names should be kept as short as possible.

|
Dexterity can display a maximum of 15 menus at one time, regardless of whether space is available on the menu bar. |
You can define an access key for the menu by placing an ampersand (&) in the menu display name. The ampersand won’t be displayed in the menu name at runtime. Instead, the character immediately following the ampersand will be underlined. To choose the menu, a user can press the ALT key and the underlined character at the same time.
Application-level menus can inherit sets of predefined items that perform special actions in your application. Click the Options button in the Menu Definition window to display the Inherited Menu Options window.
The following table lists the groups of menu items that can be inherited and where the items will appear in the menu.
|
Option |
Menu items |
Location |
Description |
|---|---|---|---|
|
About Application |
About... |
At the bottom |
In Windows, contains the item allowing the application’s About Box to be accessed. This item won’t appear on the Macintosh. |
|
Clipboard Functions |
Undo Cut Copy Paste Clear Select All |
At the top |
The standard cut/copy/paste items commonly found in graphical applications. |
|
Window List |
List of open windows |
At the bottom |
List of the standard windows currently open. Palette and toolbar windows are not included in this list. |
|
Tools - Report Writer |
Report Writer Modify Current Report |
Subitems of the Customize menu item |
Accesses the Runtime Report Writer or attempts to open the current report. |
|
Tools - Modifier |
Modifier Modify Current Window |
Subitems of the Customize menu item |
Accesses the Modifier. If VBA is installed, several VBA menu items are also displayed. |
|
Tools - Customizations |
Customization Status Customization Maintenance |
Subitems of the Customize menu item |
Displays the Customization Status window and the Customization Maintenance window. |
|
Tools - Macro System |
Play/Stop Play Record/Stop Record Pause/Continue Suspend Recording Step --------- Status Window Dump Field Dump (All) Field Dump (Selected) Menu Dump Menu Dump All Table Dump Open Form Insert Header Insert Comment |
At the top |
The items to access Dexterity’s built-in macro system. By default, the first group of items is included in the menu. The second group of commands are accessed by adding the ShowAdvancedMacroMenu=TRUE setting to the defaults file. |
|
Tools - Integration Manager |
Integration Manager Table Import |
Subitems of the Integrate menu item |
These items are used only by Microsoft Development. |
|
Tools - Table Import |
Table Import |
A subitem of the Integrate menu item |
This item opens the Table Import Definition window. |
|
Tools - Resource Descriptions |
Tables Fields Windows |
Subitems of the Resource Descriptions menu item |
These items open the Table Descriptions, Field Descriptions and Window Descriptions windows. |
Use the Menu Items list to define additional items for the menu. You can specify the menu item’s name, shortcut and action. You also indicate whether focus is pulled from the current window when the menu item is chosen.
After clicking New to create a new item, enter the name of the menu item in the Item name field. The &, #, - and ~ characters have special meaning in menu item names. These characters are described in the following table.
|
Character |
Effect |
|---|---|
|
& |
Makes the next character underlined and act as the access key.. |
|
# |
Draws an ellipsis (…) after the item. |
|
- |
If used as the item name, causes a separator line to appear in the menu. Use separator lines to group items in the menu. |
|
~ |
Draws a forward slash (/). |
You can define a shortcut for the menu item by selecting a value from the Shortcut field. The shortcut is CTRL + the specified character. To avoid conflicts, a shortcut key should be used only once in an application.
The Action drop-down list specifies whether the menu item will perform a predefined action or run an application script. You can choose a predefined action or application script .
Predefined actions The following table lists the predefined actions that can be assigned to the menu item. These predefined actions can be assigned to form-level or application-level menus. A specific predefined action should be assigned to only one menu item in the application.
|
Action |
Description |
|---|---|
|
Application Script |
Runs the script attached to the menu item. |
|
Runs the line delete script for a scrolling window. |
|
|
Help Contents |
Displays the help contents topic. |
|
Help on Help |
Displays help for the Windows help system. |
|
Help on Item |
Displays help for the currently focused item. |
|
Help on Window |
Displays help for the current window. |
|
Help Search |
Displays the search window for the help system. |
|
Runs the line insert script for a scrolling window. |
|
|
Lookup |
Opens the lookup form for the current field or runs the change script linked to the current field using Link Lookup. |
|
Modifier |
Provides access to the Modifier. |
|
|
Runs the print script for the current window. |
|
Print Setup |
Displays the Print Setup window for the current operating system. |
|
Process Monitor |
Opens the Process Monitor window. |
|
Quit Application |
Closes the application. |
|
Report Writer |
Provides access to the Runtime Report Writer. |
|
Show Required |
Displays the required fields for the application. |
Scripts You can attach a script to the menu item. Be sure Application Script is selected in the Action drop-down list and click the Script button. The script will be run each time the menu item is chosen.
Mark the Unfocus option to cause the focus to be pulled from the current window when the menu item is chosen. This causes any pending field scripts to be run before the menu item’s action is carried out. If the application is in a state such that the menu action can’t be performed, the field’s scripts can then prevent the action from being performed. If you don’t mark the Unfocus check box, the focus will remain in the current field when the menu item is chosen.
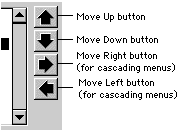
You can use the positioning buttons to the right of the Menu Items list to change the position of items in the menu. These buttons are shown in the following illustration.
![]()