Some of the items specified in the report definition include the name of the report, whether any restrictions will be used to control the scope of the data included when the report is generated, and which tables data presented in the report will come from.
To create a new report definition, start the Report Writer. In the Report Writer, click the Reports button on the toolbar to open the Report Writer window. Click the New button to open the Report Definition window.
Enter a report name. Supply a name that accurately describes the purpose of the report.
Series assignments allow you to group related reports in the accounting system using categories like Sales, Financial and Inventory. To ensure the consistent use of series, it’s a good idea to use the series of the primary table as the report series.
The name of each table in the current dictionary is displayed in the list box below the Main Table field. From this list, select the table you want to use as the main table for the report. The main table is typically the table that contains the majority of information used by the report. Refer to Data Storage for information about how to determine which tables to use for your reports.
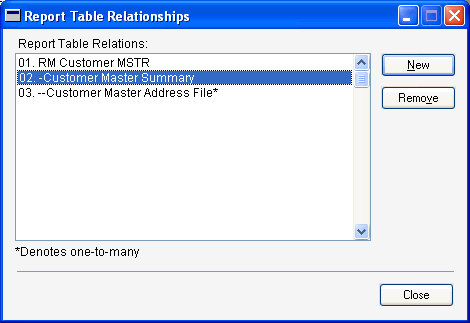
Data for the report may need to come from tables other than the main table. If this is the case, you need to attach additional tables to the report. To do this, click the Tables button to open the Report Table Relationships window. The report’s main table will be the only table listed in this window. The number 01 will appear to the left of the table name, denoting its status as the report’s main table.
Click New to add another table to the report. The Report Tables window will open. This window contains a list of all tables that have a relationship with the main table already defined using the Table Relationship Definition window. An asterisk appearing next to the table name denotes a one-to-many relationship. Select the desired table and click OK. Each table that is added to the report and is directly linked to the main table will be listed below the main table in the Report Table Relationships window, with a single dash to the left of the table name.
To add a table that is linked to a table other than the main table, select the secondary table’s name in the Report Table Relationships window and click New. Select the name of the table to be added and click OK. This table will appear in the Report Table Relationships window below the table that it is linked to, and will have two dashes to the left of its name.
The following illustration of the Report Table Relationships window shows the dashes that denote levels of linking.
You can have only one one-to-many relationship among the tables used for the report. For example, if the Customer Master Address File table has a one-to-many relationship with another table used in the report, all of the other relationships must be one-to-one.
Once you have added all the necessary additional tables, click Close to close the Report Table Relationships window.
Use the Max Records field to restrict the number of records that will be printed on the report. The default value for this field is 0, which indicates that all records will be printed.
If you enter the number 10 in the Max Records field, for example, only the first 10 records in the report will be printed, unless a restriction has been created to specify another number. Any limit set using a restriction overrides the limit set using the Max Records field.

|
You may want to enter a relatively small number while you’re creating the report, so that test reports will be generated more quickly. Be sure to change the number to 0 or another appropriate number when you are finished testing. |
What is an appropriate number depends upon the type of report and how it will be used. For example, you could generate a report that lists all sales statistics by salesperson. If the user will only want to view the top ten salespersons, you could set the Max Records field to 10.