


Use this procedure to create a purchase requisition workflow configuration based on the purchase requisition workflow template provided with Microsoft Dynamics AX. The configuration of the template varies from one organization to another. You must configure the template to reflect the business process for purchase requisitions in your organization. The following procedure describes a recommended configuration based on the example in Overview of a purchase requisition workflow.
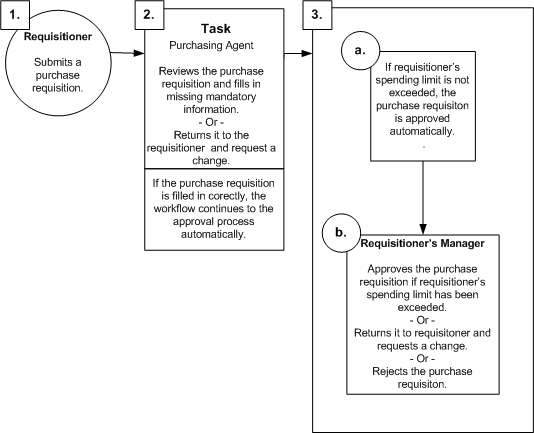
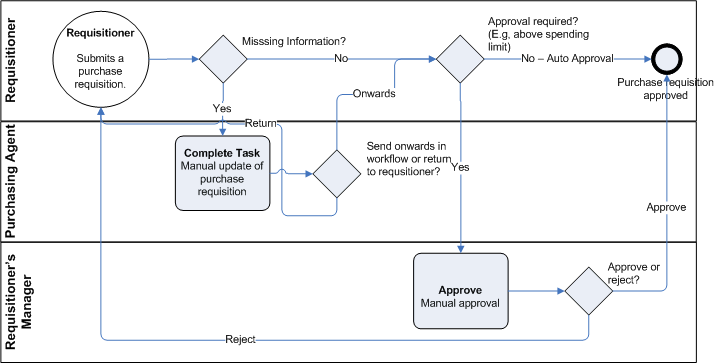
The following illustrations display overviews of the purchase requisition workflow and the purchase requisition workflow configuration.
NoteTwo purchase requisition templates are provided with Microsoft Dynamics AX: a general purchase requisition template ( ) and a purchase requisition template specific to purchase requisitions created in Project ( ).
 Create a
purchase requisition workflow configuration
Create a
purchase requisition workflow configuration
Use this procedure to select the template to base the workflow configuration on.
-
Click > > .
-
Click to open the form.
-
Select the template from the list.
-
Click to create the configuration. The form opens.
-
In the field, type a name for the workflow.
 Note
Note
|
|---|
|
If you want to use both the and workflow configurations, you must define the following condition. |
|
Where |
. |
Is |
[Leave blank] |
Then define the following condition in the Project workflow configuration.
|
Where |
. |
Is not |
[Leave blank] |
Enter
instructions
Use this procedure to create the instructions for the users who will be submitting purchase requisitions for processing and approval in the form.
You also can insert placeholders in the instructions that will be replaced with the appropriate data when the instructions are displayed to users. For example, you might enter the following message text:
The vendor and/or price is missing on one or more of the purchase requisition lines. Please update purchase requisition % . PurchReqId%. If you cannot complete this task, return the purchase requisition to % . Requisitioner%.
These instructions contain placeholders for the purchase requisition ID and the user who created the requisition.
|
Note
|
|---|
|
A list of available placeholders and their descriptions is included in the area of the form. |
-
In the form, click to open the form.
-
Click to select the language used in the instructions.
-
Type the instructions in the field.
To insert a placeholder:
-
Click in the message text to specify where the placeholder should appear.
-
In the list, select the placeholder to insert.
-
Click .
-
-
Repeat steps 2 and 3 for each language in which you want to display the instructions.
-
Click OKto return to the form.
Configure the
task
Use this procedure to configure the purchase requisition completion task. In this example, the purchasing agent receives a request to fill in the missing mandatory information (net amount and vendor information) on the purchase requisition line.
For more information about workflow tasks, see Configure a task.
-
In the form, click the tab.
-
In the field, select the PurchReqComplete (Required)task. The details of the task are displayed in the lower pane.
-
On the tab, type a name for the task in the field, such as Fill in missing information.
-
Click to add a subject that describes the task to the user, such as Add missing information to the purchase requisition. The subject will be displayed in the form when the purchasing agent receives a request to fill in the missing mandatory information. Click OK.
-
Click to enter instructions that will be displayed in the form. For more information, see the previous procedure. Click OK.
-
Click to set a time limit for the task, such as five days.
-
Click the tab to define a condition. In this example, vendor and net amount information is mandatory on the purchase requisition line.
Where
.
Is not
[Leave blank]
And
Where
.
>
0.00
The task runs automatically when the condition is met.
-
In the field, select .
-
Click the tab and then click to specify who the task should be assigned to:
-
– Assign the task to all users in a specific role. Select the appropriate user group.
-
– Assign the task to a specific level in the hierarchy.
-
– Assign the task to specific users. Select the appropriate users.
For more information, see Assignment (form).
In this example, select and select a user group from the list, such as a purchasing agent user group.
-
-
Click the tab to define what should happen when a user has not acted on a task by the task's due date. In this example, click to escalate the task to one or more users, and then click to specify which user to escalate the task to. For more information, see Workflow: Workflow Name (form).
-
Click the tab in the lower pane to specify when to send notifications to users, and which users to send them to. For example, you might want to notify the user who requested the items if the requisition is returned for changes.
-
For this example, click , select the option, and select in the list. Click OKto return to the form.
-
Select the check box for the event to enable the notification, and type a message to the user in the field.
-
Click the tab to specify which actions will be available to users. For more information, see Workflow: Workflow Name (form).
Configure the
approval
Use this procedure to configure the purchase requisition approval.
-
In the form, click the tab.
-
In the field, select the PurchReqApproval (Required)approval. The details of the approval task are displayed in the lower pane.
-
On the tab, type a name for the approval in the field, such as Approve purchase requisition.
-
Click the tab. Click and specify a condition, such as the following example.
Where
.
<=
.
-
In the field, select . The purchase requisition will be approved automatically if the purchase requisition total amount is less than or equal to the spending limit for the user who created the purchase requisition.
-
Click to specify when to notify a user. For example, you might want to notify the user who requested the items when purchase requisitions are approved or rejected.
-
For this example, click , select the option, and select in the list. Click OKto return to the form.
-
Select the check box for the and events to enable the notification, and type a message to the user in the field.
-
Click the tab to specify which actions will be available to users. For more information, see Workflow: Workflow Name (form).
-
In the list, click to configure the details for the step.
-
On the tab, type a name for the step in the field, such as Approve.
-
Add a subject and instructions for the user who will approve the purchase requisitions. The subject and instructions will be displayed in the form when the purchasing agent is approving purchase requisitions.
-
Click the tab to specify a condition.
-
Click the option. In this example, the approval is always routed to the manager of the user who requested the items if that user exceeded his or her spending limit for purchase requisitions (see step 4 in this procedure).
-
Click the tab to specify the user to assign the approval to.
-
For this example, click and select .
-
In the field, select Requisitionerto indicate that the approval process starts from the position in the hierarchy of the user who requested the items, and then moves on to that user's manager, the manager's manager, and so on.
-
Select and click to define a stop condition, which is when to stop the approval process. The following table includes an example of a stop condition.
Where
. . Limit ID
>=
.
For more information about limit types, see Limit types (form).
-
Click OKto return to the form.
-
Save the configuration and close the form to complete the purchase requisition workflow configuration.
-
In the form, select the check box next to the workflow configuration to activate it.
Note
To designate a workflow as the default workflow, click the tab and select the check box next to the workflow configuration.
